Verification
What is UVM Factory?
 June 8, 2023
 6 minutes read
 19079 Views


In this article, we will discuss what is UVM Factory, the necessity of a UVM factory, and how to use a UVM Factory.
What is UVM Factory?
The factory is a centralized location to create the instance of the uvm component and object classes in UVM.
The necessity of UVM Factory
Consider the following DUT (Router) as an example to understand the necessity of using the factory in UVM.

Fig 1: Router
A Router is a networking device that routes the incoming packet from a source network to one of the destination networks among the three, based on the address available in the packet.
There will be three destination FIFOs inside the router. When a data packet comes in, from the source, the ROUTER reads the HEADER information in the packet to determine its ultimate destination network and routes the packet to the particular network by writing the data into the corresponding FIFO. The destination network should read the data within 30 cycles once the data is available in the FIFO else the soft reset will get enabled & clears the FIFO.
The UVM TB architecture to verify the router is shown below. The TB consists of one source agent and three destination agents.

Fig 2: Testbench Architecture
In the test cases, to read the different types of input packets driven from the source driver, the destination agent should drive read enable within 30 cycles once the valid out goes high. In a test case to verify the soft reset scenario, the destination driver should drive the read enable after 30 cycles of valid out. For this particular test case, we need to override the existing drivers inside the destination agents. We will now discuss, by using UVM Factory, how we can override the parent driver with the child driver from the test case.
Also read: UVM SoC Testbench
How to use UVM Factory
The usage of Factory involves three steps.
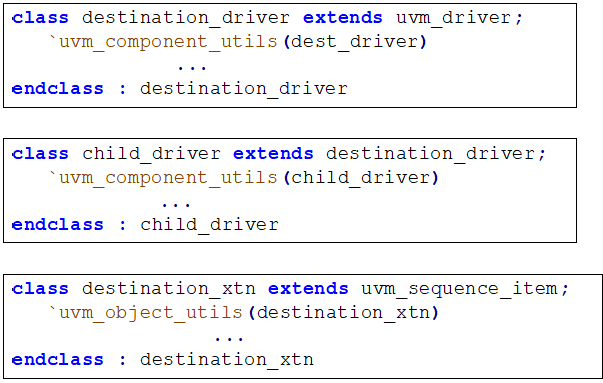
The first step is to use macros to register all the class types with the factory. In order to use the factory, to create or override an object/component, all the object and component classes must be registered with the factory. The classes used to create the testbench structure are registered using the macro `uvm_component_utils and the classes used for stimulus generation are registered using the macro `uvm_object_utils. The above macros get to expand into the following steps.
- Declares typedef wrapper type named type_id for registry class
- Defines the function get_type which will return the type_id
- Defines the function get_type_name which will return the class name
Example:
The second step is creating the instance of the class using the factory method create. Before we see how to use create method, we will discuss the constructor defaults for component and object classes.
UVM components follow a tree-like hierarchy to build the testbench structure, where each component builds all of the components that are one level lower in the hierarchy, so each component names (and builds) its children, and passes a pointer to itself (this pointer) to each child component, so they know where they are located in the hierarchy (who is the parent device for each constructed component).
Also read: Verification IP Vs Testbench
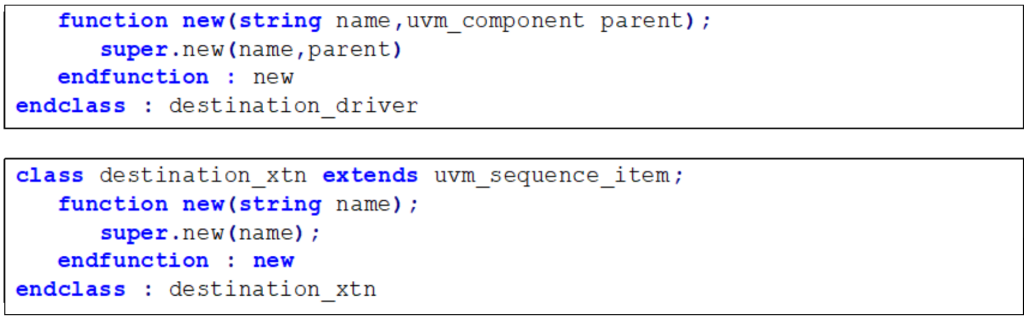
For components, the typical constructor is shown below,

For transactions (data objects), each object is a unit of data with multiple fields, and transactions do not have a parent. For transactions, the typical constructor is shown below,

Example:
In UVM to create the instance of component classes and object classes it is not recommended to use directly the class constructor. The recommended method in UVM for creating testbench components or transaction objects is to use the built-in method ::type_id::create command.
Create is a static method defined inside the registry class. The scope resolution operator is used to access this static method, create, using the wrapper of the registry class which is type_id.
For example, to construct the driver inside the agent the create method has to be called in the build phase of the agent using the type_id of the driver as shown below.
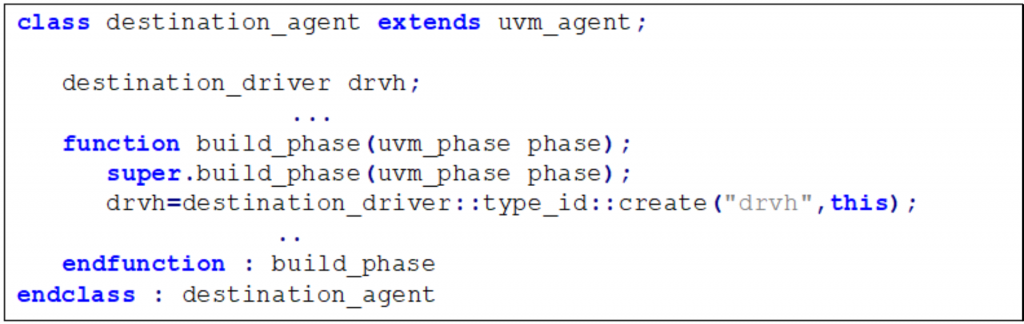
The create method in turn calls the class constructor based on the type_id using which the create method is called. In the above example, the create method will call the constructor of destination_driver class which will create its instance and returns the reference of the object to the handle drive.
The third step is Overriding Components and Objects using the factory overriding methods. There are two types of overriding methods.
- Global override – set_type_override_by_type

- Instance override – set_inst_override_by_type

These override methods will override the original type type_id with the substitute type.
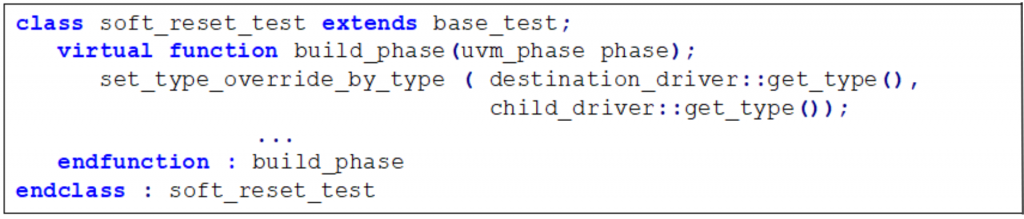
As discussed above, in one of the test cases if we want to replace the destination_driver class with child_driver to verify the soft reset scenario, we have to override the type of driver created inside the agent from the top-level component i.e., from the test class by using the above override methods.
Note: The build phase executes in the top-down approach
Also read: Best Resources to Learn SystemVerilog and UVM
The global override method instructs the factory to override the type_id of destination_driver with the type_id of child_driver inside the destination_driver present in all three destination agents. Now, as the type_id is overridden, the type_id::create method in all the destination agent’s build phase is called with the type_id of child_driver, hence the create method calls the constructor of child_driver which will create the instance of child_driver inside all the three destination agents.
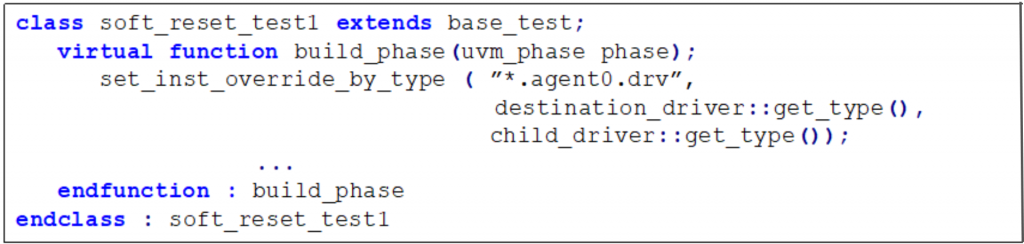
The instance override method instructs the factory to override the type_id of destination_driver with the type_id of the child_driver inside the driver present in a particular destination agent. In the below example, the destination_driver type_id is overridden with child_driver in the agent0, hence the type_id::create method inside agent0 is called with the type_id of child_driver, so the create method in the agent0 build_phase calls the constructor of child_driver which will create the instance of child_driver. agent1 and agent2 will still have the instance of destination_driver class only.
In this way, the UVM factory provides the user with the flexibility to change the type of component or object created inside the testbench environment from the test class without editing the source code inside the testbench environment.
Want to know more about UVM and start your career in VLSI? Explore our Universal Verification Methodology Course designed and delivered by the top industry experts.

Share This Post:


75,221
SUBSCRIBERS
Subscribe to our Blog
Get the latest VLSI news, updates, technical and interview resources
